In this article:
- Recording Overview
- Recording Settings
- How to assign recording privileges to a participant
- How to start a local recording
Recording Overview
The ability to record locally should be enabled by default on your venue / pool account.
You will need two laptops to do both cloud recording and local recording. Hosts and co-hosts can only control cloud recording. Only a normal participant can record locally (after they have been given permission by a host or co-host).
Laptop 1 (Host Laptop) - Host or co-host
Laptop 2 (Record Laptop) - joining with the participant link, NOT logged in with account credentials
A host or co-host can record locally but it will switch off the cloud recording. This is why two laptops are used, one for host control of cloud recording and one as a participant with recording privileges for local recording.
Recording Settings
You can see slightly different (or expanded) options depending on whether your account is licensed or not at the time you are looking at the settings.
Most of the key settings are locked down to make that the recordings are correct and consistent.
Locked Sections (Locked by Admin)
- Local recording
- Advanced local recording settings
- Cloud recording
- Advanced cloud recording settings
- Require passcode to access shared cloud recordings
- Delete cloud recordings after a specified number of days
- The host can delete cloud recordings
- Recording notifications - Zoom clients
The rest of the settings have a default which you shouldn't need to change but are able to change if needed.
How to assign recording privileges to a participant
- As the host in a Zoom meeting, click Participants
.
- In the participants menu, navigate to the participant who you want to grant recording privileges tp and click More next to their name.
- Click Allow Record.
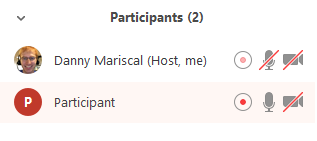
The participant will receive a notification about recording privileges. When a participant is recording, the participant menu will display a recording icon next to the participant's name. - To disable the participant's ability to record, click More next to the name, then click Forbid Record.
The participant will receive a notification about no longer having recording privileges.
How to start a local recording
A participant with recording privileges can record the meeting locally (remember, if a host records the meeting locally, it will turn off the cloud recording).
- Click Record
.
- If there is a menu, select Record on this Computer.
Hosts will see the following recording indicator in the top-left corner while recording is active.
Participants will see the following indicator in the top-left corner while the recording is active. - Click Participants to see which participants are currently recording.
Note: Dial-in participants will hear a message informing them that the meeting is now being recorded unless disabled by the host. - After the meeting has ended, Zoom will convert the recording so you can access the files.
- Once the conversion process is complete, the folder containing the recording files will open.
Note: By default, the recording files are formatted a certain way. The audio/video file (MP4) will be named video[random number].mp4. The audio only file (M4A) is named audio[random number].m4a.


Was this article helpful?
That’s Great!
Thank you for your feedback
Sorry! We couldn't be helpful
Thank you for your feedback
Feedback sent
We appreciate your effort and will try to fix the article